Tuesday, February 5, 2008
Engine Work Continues...
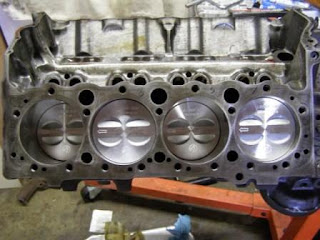
The dent was beaten out of the oil pan. The torn fuel pump gasket has been replaced. Three head alignment dowel pins have been installed... as only one came back from the machine shop. A number of 1/4 inch pipe plugs recessed allen heads have been installed, after searching high and low for such beasties.
The timing cover has been cleaned up, straightened... and the seal which was glued in with the most tenaciousness stuff in the universe has been removed. The paint can used to support it while it was smacked out with a drift, will never be the same. The big socket I usually use to pop them out slid through the middle... my seal puller is still depressed. My drift went through the steel shell more than once. In the end, with ever increasing hammer size and drift diameter it succumbed to a force mightier than the sword or pen... the hammer! (PETA Announcement: No live seals were harmed in the writing of this paragraph...)
Soon enough this Chevrolet will be painted. It will be painted red, but only under fluorescent lights... under any other it will closely resemble international safety orange. The engineers at Chevy must have been trying to warn us car guys...
Wednesday, January 30, 2008
Engine.


I tore the engine down, took it to the machine shop to have it hot tanked. Had the cylinders bored thirty thousandths larger than stock to clean up some pitting. They resized the rods installing ARP bolts, and pressed on the new forged TRW SpeedPro pistons on. When I got everything back I started assembly, though I don't have any pictures of putting the rotating assembly together... (Assembly lube and cameras don't mix!)
The camshaft is a CompCams 268H. The heads are the stock 76cc chambers, which have been gone through with new valve train. (Thanks Tom!) I have a set of ceramic coated Flowtech headers that are going on, as well as solid motor mounts to tighten up the front suspension.
Frame removal.
Remove the rocker panels, and anything that spreads the gap between the body and frame. Jack the body up from the frame on the rocker channels, and place jack stands along the edge alternating sides. Once high enough to slide a 4x4 between the gap, make blocks under the cowl body mounts that extend low enough that the 4x4's do not touch the front fenders. There is a recess for the 4 inch wide cradle used at the factory. On the rear half of the car, lay a 4x4 across just behind the seat belt reinforcement.


Jack up one 4x4 and and move that pair of jack stands under it, far enough outboard to clear the frame. Alternate raising until the body clears the frame, my jack stands did not go high enough to back the chassis out from under the body. I removed the wheels and used one jack under the front cross member and one under the differential.

Once the frame is out from under the body, lower it down to sane levels and brace the nose so it does not flex the bonding seams and crack.

One 1975 Corvette, in need of some time love and care. This is the only picture I have of her when she was somewhat complete. Very tired, and worn around the edges.

Looking inside...

This is what happens when a car turns into a project. That is the old 350 engine, which as pictured is missing some parts. It was about to make its exit. Something makes project cars paint fall off...
Tuesday, January 29, 2008
Intro
Welcome everyone. I'm Zach, this is the place for photos and information about my 1975 Corvette, and its frame off restoration!
It’s been a long project with lots of hurdles to overcome, but the light is at the end of the tunnel. She was in need of a complete restoration when I got her. Eggshell white paint... textured about the same as one too!
It all started with the replacement of the exhaust system. She was not road legal, with all the emissions equipment missing and dual exhaust. I started removing the exhaust system, and one of the studs on the passenger side. It all spiraled down hill from there, before I knew it the air conditioning was out of the way and the manifold was coming off. Then one of the heads stripped out... and the engine was coming out. Uhoh.
I pulled the engine and the transmission as one unit... and somewhere along the way decided to rebuild the engine, while I was in there. While I was cleaning out the engine compartment, and spotted a tear in the frame. Uhoh!
"While I'm at it" is a disease known to car guys 'round the world. With great expense and time, the desire to do things right drags projects on and on! Things spiraled out of control as my simple exhaust system replacement turned to frame off restoration.
The Corvette, is a Coupe… that’s T-tops for those without the secrete decoder ring. It has the L48 model engine, which in stock form made 165 ground shaking, thumping… horsepower. It has an automatic transmission, a TH400, which is a three speed without overdrive. The numbers match.
Originally she was “Bright Blue” with a blue custom interior. Power windows, Tilt/telescoping wheel… fully loaded!